
Updated Oct 29, 2026
Windows
There are two ways to connect a Windows PC to your public IP address. Pick one:
GetPublicIP for Windows (Beta)
This app is in beta. It's ready to use and updates itself as we improve it. If something doesn't work, contact us and tell us what happened.
GetPublicIP for Windows connects your PC to your public IP address with nothing to configure by hand. It downloads its configuration for you, adds the Windows Firewall rules your port mappings need, and keeps itself in step with your dashboard. It runs on Windows 10 or 11.
Download and install
- Download the installer for your PC. If you're not sure which one you need, choose 64-bit.
- Run the
.msifile and approve the administrator prompt. The prompt names GetPublicIP Limited as the publisher. - The installer adds a background service that starts with Windows, and a GetPublicIP icon in the system tray.
Sign in with your API key
The app signs in with the API key of the IP address you want to use. If you don't have one yet, see Create an API Key.
- Open GetPublicIP and go to the Status tab.
- Paste your API key and click
Connect.
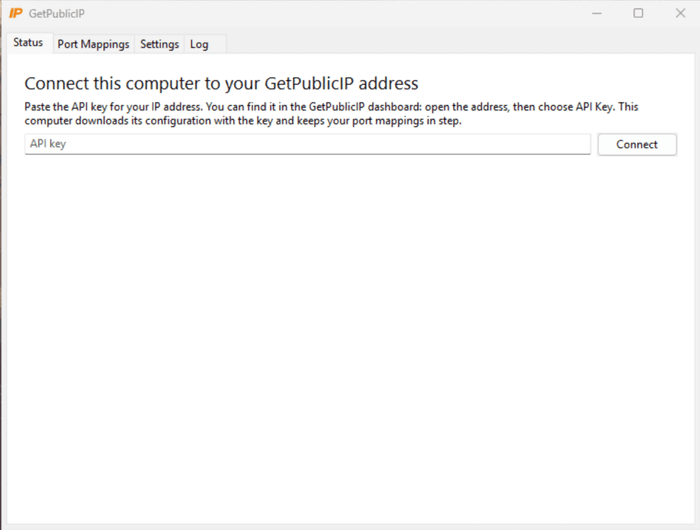
The app downloads the configuration, connects the tunnel and keeps it in step with your dashboard. There's no config file to import.
Status tab
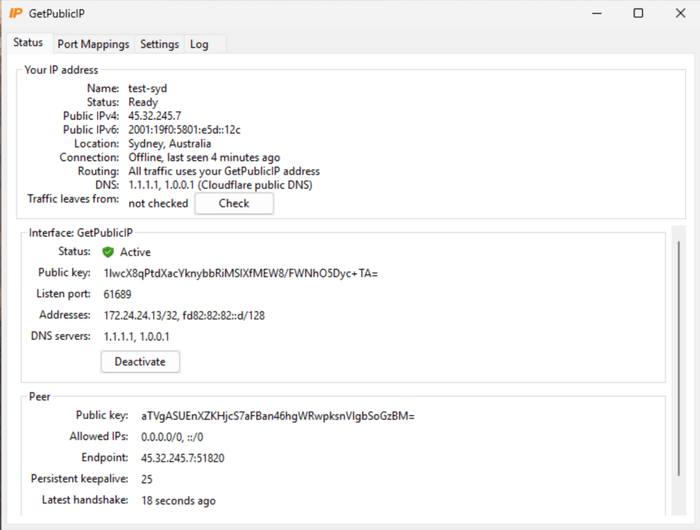
The Status tab shows the IP address's name, its status, its public IPv4 and IPv6 addresses, its location, and the current connection, routing and DNS.
Click Check to see which address your traffic is leaving from right now.
The connection line reads Connecting… while the tunnel starts. It reads No response from the server if our server doesn't answer. See Troubleshooting below.
Below that are the tunnel's interface and peer details, with a Deactivate button.
Port Mappings tab
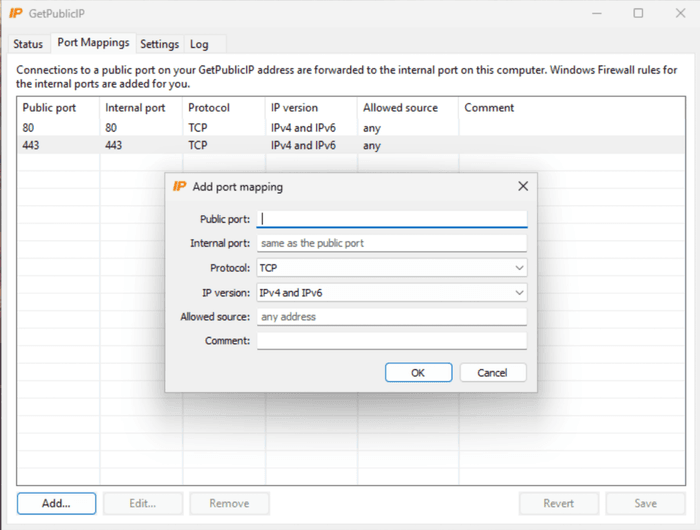
Use Add, Edit and Remove to manage your port mappings, then click Save. Revert discards changes you haven't saved yet.
The app adds Windows Firewall rules for the internal ports automatically, so there's no firewall to configure yourself.
The Listening column shows the program on each internal port, and whether connections forwarded to it can reach it:
✓ nginx.exe on 0.0.0.0: the program listens on all addresses, so it can be reached.✗ nginx.exe on 127.0.0.1 only: not reachable: the program only accepts connections from this PC. Set it to listen on0.0.0.0(all addresses), or on the tunnel address.✗ Nothing listening: start the program, or check its port matches the internal port.⚠ game.exe on 0.0.0.0: first reply to new clients lost in split tunnel: a UDP program listening on all addresses, in split tunnel. See Troubleshooting below.
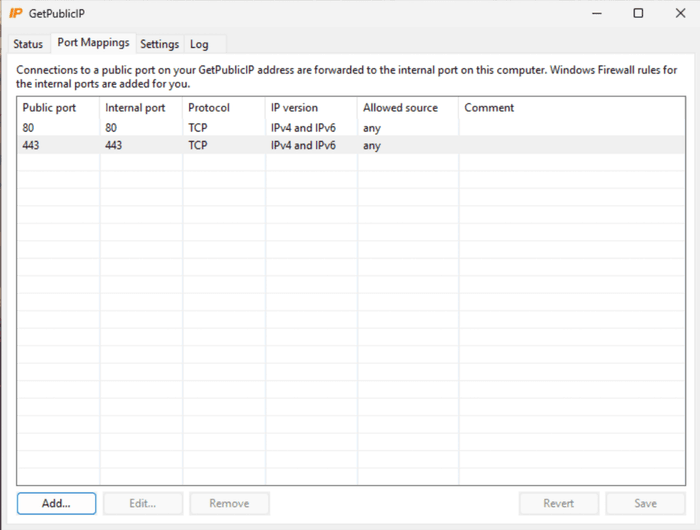
Each mapping has a public port, an internal port, a protocol, an IP version, an allowed source and a comment. Leave the internal port empty to use the same port as the public one, and leave the allowed source empty to accept connections from any address.
Settings tab
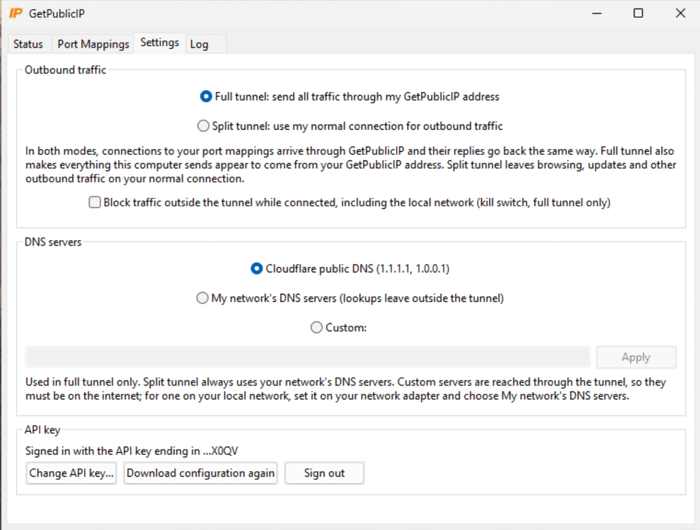
Outbound traffic
- Full tunnel: all of your traffic leaves from your GetPublicIP address. This is the default.
- Split tunnel: normal browsing uses your own internet connection, while traffic to your port mappings still comes in through GetPublicIP.
Kill switch
The setting is labelled "Block traffic outside the tunnel while connected, including the local network (kill switch, full tunnel only)". It's off by default and only works with Full tunnel. While it's on, devices on your local network, such as printers and file shares, are blocked too.
DNS servers
This setting only applies in Full tunnel. Split tunnel always uses your network's DNS servers.
- Cloudflare public DNS: the default.
- My network's DNS servers: uses the DNS servers set on your network adapter. Lookups then leave outside the tunnel.
- Custom: enter the addresses of public DNS servers on the internet, then click
Apply.
A local DNS server, such as a Pi-hole or your router, can't be entered as Custom. To use one, set it on your network adapter in Windows and choose My network's DNS servers. That option can't be used with the kill switch.
API key
- Change API key: switch the app to a different key.
- Download configuration again: fetch a fresh copy of the configuration.
- Sign out: sign the app out of your IP address.
Log tab
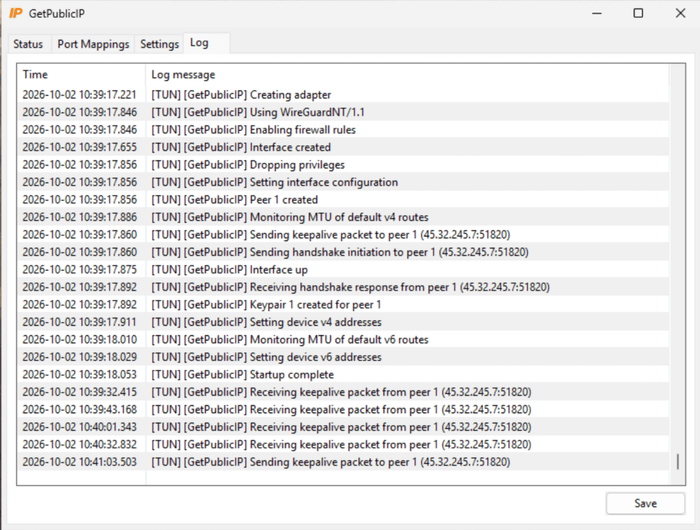
The Log tab lists what the tunnel has been doing, such as connecting and handshakes with our server. Save saves the log to a file.
Support tab
If something isn't working, the Support tab gathers what we need to help: the status, your port mappings and what's listening on them, the app's services, your Windows Firewall settings and security software, your network routes, and the recent log. Click Copy to clipboard and paste it into your message to contact us, or click Save to file… and attach the file.
The report includes your IP addresses and network details. It never includes your API key or the tunnel's private key, and you can read all of it before you send it.
If the app's window won't open, an administrator can make the same report, without the status and port mappings, from a Command Prompt:
"C:\Program Files\GetPublicIP\getpublicip.exe" /supportreport %USERPROFILE%\Desktop\getpublicip-support.txt
Tray icon
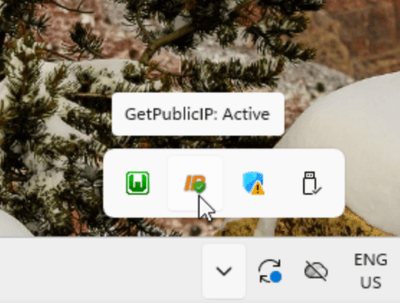
Hover over the tray icon to see whether the tunnel is active. Right-click it to see your public IPv4 and IPv6 addresses while you're connected.
Updates
The app checks for updates by itself. When one is available, the tray icon shows An Update is Available! and an administrator on the PC clicks Update Now. Your settings and the tunnel are kept.
Uninstall
On Windows 11, open Settings > Apps > Installed apps, find GetPublicIP and choose Uninstall. On Windows 10, the same list is under Settings > Apps > Apps & features.
Troubleshooting
The Status tab says No response from the server. The tunnel is running, but our server isn't answering. Check that the network you're on allows outgoing UDP to port 51820; some workplace, hotel and guest networks block it. Another VPN or a security product on the PC can also block it. If it carries on, contact us.
A port mapping doesn't connect. Check the Listening column on the Port Mappings tab. A program listening only on 127.0.0.1 can't be reached from the internet: set it to listen on all addresses (0.0.0.0).
A UDP service misses the first reply to each new client in split tunnel. In split tunnel, UDP from your mapped ports only leaves through GetPublicIP, so it never shows your home address. A UDP server that listens on all addresses (0.0.0.0) would send its first reply to a new client through your normal connection, so the app blocks that reply and routes the client through the tunnel instead. The replies after it arrive normally. The Port Mappings tab names the affected program. To keep that first reply, make the program listen on the tunnel address shown there, or switch to Full tunnel. TCP services aren't affected.
Printers, a NAS or Remote Desktop to local PCs stop working. With the kill switch on, your local network can't be reached while you're connected. That's by design. Turn the kill switch off to reach them.
Your browser shows a SmartScreen warning. The installer is signed by GetPublicIP Limited. Check that the warning names GetPublicIP Limited as the publisher before you continue.
Switching between this app and the WireGuard app. Both can be installed on the same PC. Only use one tunnel at a time for the same IP address: two devices or apps using one key fight over the connection.
Using the official WireGuard app
This method uses the standard WireGuard client and stays fully supported. You download a config file from your dashboard, import it into WireGuard and open your ports in Windows Firewall yourself.
Download and install WireGuard
- Download the Windows installer from the WireGuard website (https://www.wireguard.com/install/)

- Run the installer

- Click Yes to proceed

Configure WireGuard
- Download the configuration file (
pi0.conf) from your IP address in the dashboard: under Configuration, clickWindows. The Windows button needsRoute all traffic through my public IPswitched on. - Open WireGuard and click
Add Tunnel

- Select the configuration file you downloaded

- You will now have a new tunnel in WireGuard. Click
Activateto start the VPN connection

- You are now online. Remember to enable applications through the Windows firewall

Configure Windows Firewall
- In this example, I will open ports 80 and 443 for HTTP and HTTPS. Open
Windows Defender Firewallby searching forfirewallin the start menu

- Click
Advanced Settingsin the left hand menu

- Click
Inbound Ruleson the left hand menu

- Now click
New Rule...in the right hand menu

- Select
Portto open a port. You can also chooseProgramand then select the .exe

- Select the protocol and ports to open. In this example I am opening HTTP and HTTPS so I will open TCP ports 80 and 443

- Allow the connection

- If you are unsure what to select for profile then select all of them.

- Enter in a name and then click
finish

- The port will now be open on Windows, you can try and connect to it via your public IP address.